How to build a backend web service with Java Servlet?
Introduction
Web development has come a long way since the early days of static HTML pages. Today, modern web development encompasses a broad range of technologies, tools, and practices that enable developers to build dynamic, interactive, and responsive websites and web applications. This field has evolved rapidly to meet the growing demands of users and to leverage advancements in technology.
What is Java Servlet??
Java Servlet is a Java programming technology that receives any request and returns in a response using related network protocols(for web applications, usually HTTP). It usually takes in a Servlet container, like Tomcat(blocking IO) or Netty(Non-blocking IO)…etc. When a client sends a request to the well configured servlet container, the servlet container will invoke the corresponding servlet’s methods, such as doGet() or doPost(), based on the request type. After that, the servlet processes the request, generates a response, sends it back to the client, and makes the application functional.
Imagine a well-developed restaurant, the client side(frontend/UI) is the menu, the table, the seat, and the inside environment. The waiter itself is the Servlet that takes in any client’s orders back to the kitchen. The kitchen is the server side that receives all the orders(HTTP request), cooks the recipe and returns the food(HTTP response) to clients.
Why do we need to learn Java Servlet?
It is because Servlet Technology is the low-level foundation for building dynamic and interactive web applications. Studying it can help us understand advanced technology, like other latest technology like Spring MVC, Spring Boot…etc. You will have to understand that starting with Java and plain Spring framework will pay for itself with a comprehensive understanding of the whole Spring Ecosystem, which Spring Boot builds upon.
Okay, I have done enough talking, let’s jump right into the code.
Implementation
Our Goal: To make the server able to receive HTTP request, and send back JSON Object as response.
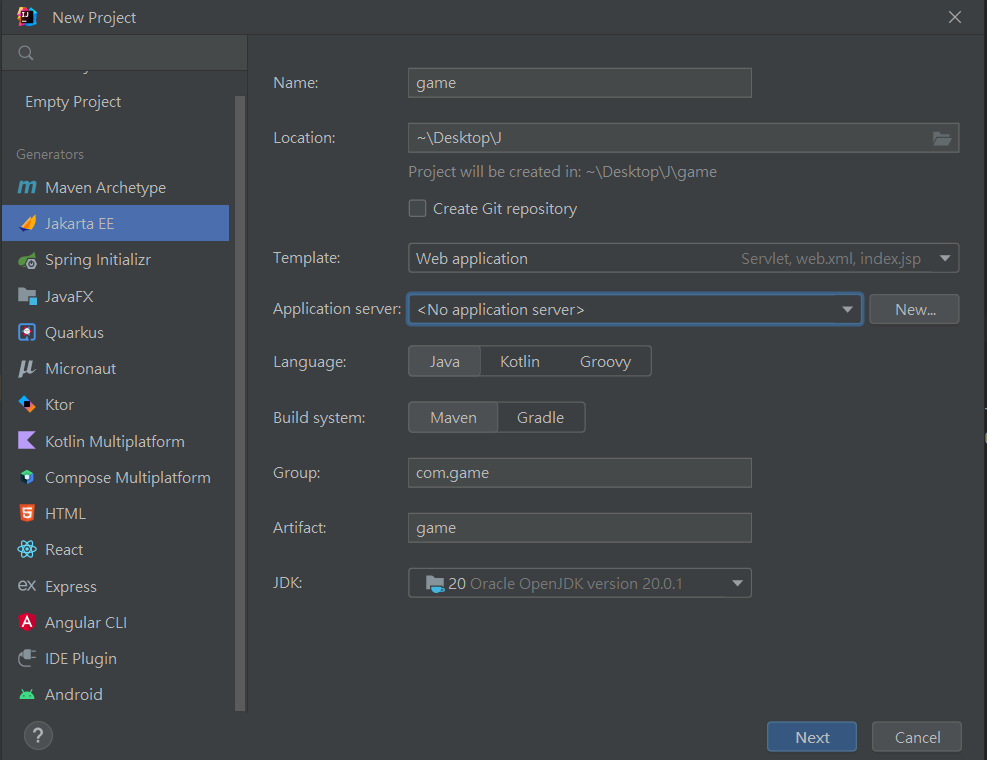
Let’s create a new Project java EE. I am using Intellij as my code editor.
Here is the basic project set up.
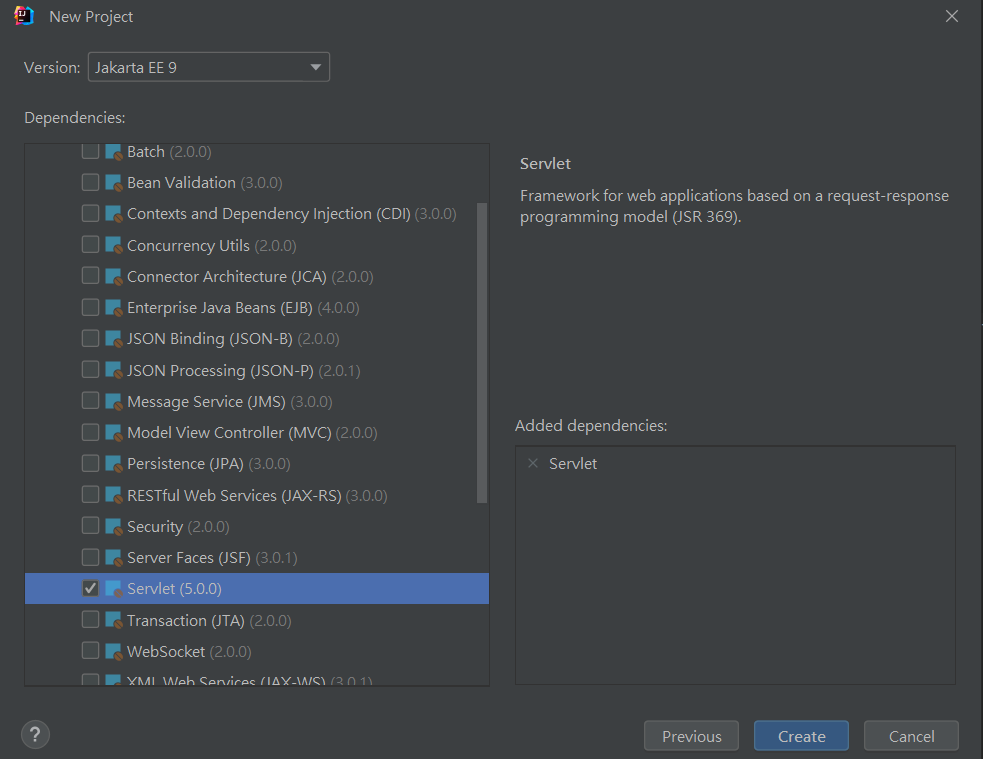
Remember to click the servlet button afterward.
Just like we have mentioned, to make the servlet runnable, we need a servlet container. In this article, we are using Tomcat as the container. To embed Tomcat, add the Tomcat dependency into our pom.xml file. And later, we can just invoke it in our ApplicationLauncher class.
using embed Tomcat(Tomcat 10.1.8 have embed version)
<dependency>
   <groupId>org.apache.tomcat.embed</groupId>
   <artifactId>tomcat-embed-core</artifactId>
   <version>10.1.8</version>
</dependency>
We are ready to create our first GameServlet. Delete the Hello Servlet, Create a file GameServelet inside the Intellij directory(or you can just change name and refractor it).

Include the following code.
import jakarta.servlet.http.HttpServlet;
import jakarta.servlet.http.HttpServletRequest;
import jakarta.servlet.http.HttpServletResponse;
import java.io.IOException;

public class GameServlet extends HttpServlet {

   @Override
   protected void doGet(HttpServletRequest request, HttpServletResponse response) throws IOException {
       response.setContentType("text/html; charset=UTF-8");
       response.getWriter().print(
               "<html>\n" +
                       "<body>\n" +
                       "<h1>Hello World</h1>\n" +
                       "</body>\n" +
                       "</html>"
       );
   }
}
Let’s take a look on the code step by step.
response.setContentType("text/html; charset=UTF-8");
In the first line of the coding block, we are setting the response content type to be text/html, so that once we send back the response, the browser can understand that you are sending back text format. If you want to send other format like JSON, you can change “text/html” to “application/json”.
response.getWriter().print(
   "<html>\n" +
      "<body>\n" +
         "<h1>Hello World</h1>\n" +
      "</body>\n" +
   "</html>"
);
In most cases, static html is just String, so here using String concatenation is good enough to render it.
Our Servlet is good, but we are still not able to start running our page. The reason behind is that we have not yet configured and started our servlet container, Tomcat.
Create a class ApplicationLauncher, and include the following code
import com.game.GameServlet;
import org.apache.catalina.Context;
import org.apache.catalina.LifecycleException;
import org.apache.catalina.Wrapper;
import org.apache.catalina.startup.Tomcat;

public class ApplicationLauncher {
   public static void main(String[] args) throws LifecycleException {

       Tomcat tomcat = new Tomcat();
       tomcat.setPort(8080);
       tomcat.getConnector();

       Context ctx = tomcat.addContext("", null);
       Wrapper servlet = Tomcat.addServlet(ctx, "gameServlet", new GameServlet());
       servlet.setLoadOnStartup(1);
       servlet.addMapping("/*");

       tomcat.start();
   }
}
Let’s break this down again.
Tomcat tomcat = new Tomcat();
tomcat.setPort(8080);
tomcat.getConnector();
We have included the Tomcat dependency previously. Right now, we are just creating the Tomcat instance, we set the port to be 8080(normally is 8080 as the backend), so after you start running the backend, you can get to the localhost8080 in the browser.
We need to run connector.
Context ctx = tomcat.addContext("", null);
Wrapper servlet = Tomcat.addServlet(ctx, "gameServlet", new GameServlet());
You need to add your Servlet to Tomcat. The second parameter, the servlet name, does not really matter, as long as it does not clash with another registered servlet.
servlet.setLoadOnStartup(1);
servlet.addMapping("/*");
You are telling Tomcat that your Servlet should react to any request that starts with “/”, i.e. any incoming request.
tomcat.start();
Lastly, you need to start the tomcat.
Now you should be able to run in your Intellij, and go to http://localhost:8080/ and see Hello World!.
Great, we just did connecting our Servlet to the Tomcat, now let’s add some flavor to our Servlet. Our goal is to make this backend server able to communicate JSON with our Frontend.
Add the following dependency in to the pom.xml file.
<dependency>
   <groupId>org.json</groupId>
   <artifactId>json</artifactId>
   <version>20211205</version>
</dependency>
<dependency>
   <groupId>commons-io</groupId>
   <artifactId>commons-io</artifactId>
   <version>2.11.0</version>
</dependency>
Change the doGet Method in our GameServlet into following code.
@Override
protected void doGet(HttpServletRequest request, HttpServletResponse response) throws IOException {
   response.setContentType("application/json");
   JSONObject game = new JSONObject();
   game.put("name", "World of Warcraft");
   game.put("developer", "Blizzard Entertainment");
   game.put("release_time", "Feb 11, 2005");
   game.put("website", "https://www.worldofwarcraft.com");
   game.put("price", 49.99);

   // Write game information to response body
   response.getWriter().print(game);
}
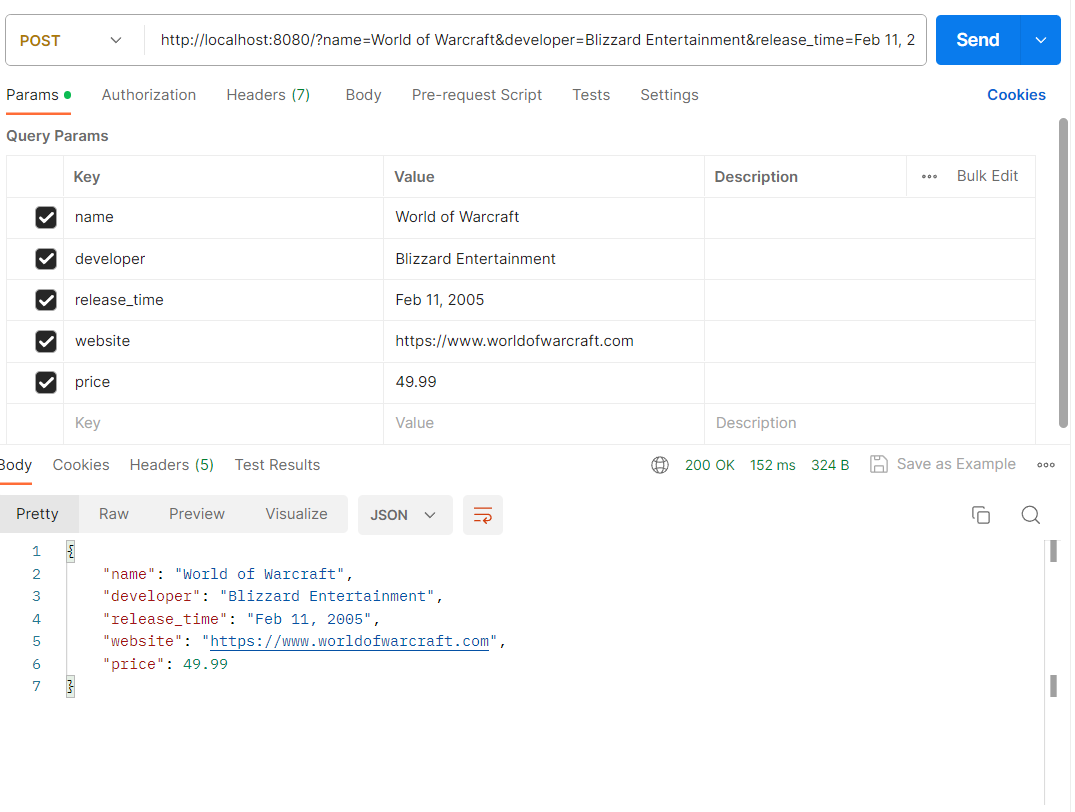
Re-start the program, and open up your localhost8080, you should be seeing something as the following.

Not Bad, At least we did see our hard-coded JSON on the website now.
However, manually parsing JSON back to the browser is not efficient, and error-prone. It doesn’t impose type safety, you can put in anything for any field. A better way to communicate in JSON is to have a model entity class, and use a library to perform the parsing. One of the most popular choices in the Java ecosystem to do JSON conversions is called Jackson (Another popular one is Gson from Google). Let’s see how the above steps can be simplified with Jackson.
First, add the dependency into your pom.xml file.
<dependency>
   <groupId>com.fasterxml.jackson.core</groupId>
   <artifactId>jackson-databind</artifactId>
   <version>2.15.0</version>
</dependency>
Let’s create a new Game class, so that it could start referrencing for our future JSON Object.
import com.fasterxml.jackson.annotation.JsonProperty;

public class Game {
   @JsonProperty("name")
   public String name;

   @JsonProperty("developer")
   public String developer;

   @JsonProperty("release_time")
   public String releaseTime;

   @JsonProperty("website")
   public String website;

   @JsonProperty("price")
   public double price;

   public String getName() {
       return name;
   }

   public String getDeveloper() {
       return developer;
   }

   public String getReleaseTime() {
       return releaseTime;
   }

   public String getWebsite() {
       return website;
   }

   public double getPrice() {
       return price;
   }

   public Game(Builder builder) {
       this.name = builder.name;
       this.developer = builder.developer;
       this.releaseTime = builder.releaseTime;
       this.website = builder.website;
       this.price = builder.price;
   }

   public static class Builder {
       private String name;
       private String developer;
       private String releaseTime;
       private String website;
       private double price;

       public Builder setName(String name) {
           this.name = name;
           return this;
       }

       public Builder setDeveloper(String developer) {
           this.developer = developer;
           return this;
       }

       public Builder setReleaseTime(String releaseTime) {
           this.releaseTime = releaseTime;
           return this;
       }

       public Builder setWebsite(String website) {
           this.website = website;
           return this;
       }

       public Builder setPrice(double price) {
           this.price = price;
           return this;
       }

       public Game build() {
           return new Game(this);
       }
   }
}
Let’s break this down a little bit
   @JsonProperty("name")
   public String name;
Jackson lets you annotate your fields or getters with the @JsonProperty annotation. Its value defines what the name of the field is going to be in the resulting JSON string. So once the backend server build the Game Object, Jackson will be able to parse the attributes inside the Game object into a JSON object.
Let’s create a GameService class. Once the servlet receives the request, we invoke the Service to help us create a Game JSON Object, and return it back.
import java.util.List;
import java.util.concurrent.CopyOnWriteArrayList;

public class GameService {

   List<Game> games = new CopyOnWriteArrayList<>(); //

   public List<Game> findAll() {
       return games;
   }

   public Game create(String name, String developer, String releaseTime, String website, Double price) {
       Game.Builder builder = new Game.Builder();
       builder.setName(name);
       builder.setDeveloper(developer);
       builder.setReleaseTime(releaseTime);
       builder.setWebsite(website);
       builder.setPrice(price);

       Game game = builder.build();
       games.add(game);
       return game;
   }
}
change our Servlet to the following.
import com.fasterxml.jackson.databind.ObjectMapper;
import jakarta.servlet.http.HttpServlet;
import jakarta.servlet.http.HttpServletRequest;
import jakarta.servlet.http.HttpServletResponse;

import java.io.IOException;

public class GameServlet extends HttpServlet {

   private GameService gameService = new GameService();
   private ObjectMapper objectMapper = new ObjectMapper();
   @Override
   protected void doPost(HttpServletRequest request, HttpServletResponse response) throws IOException {
       // the parameter has to match with our JSON object.
       String name = request.getParameter("name");
       String developer = request.getParameter("developer");
       String releaseTime = request.getParameter("release_time");
       String website = request.getParameter("website");
       Double price = Double.valueOf(request.getParameter("price"));

       Game game = gameService.create(name, developer, releaseTime, website, price);

       response.setContentType("application/json; charset=UTF-8");
       String json = objectMapper.writeValueAsString(game);
       response.getWriter().print(json);
   }
}
Let’s break this down a little bit.
   private GameService gameService = new GameService();
   private ObjectMapper objectMapper = new ObjectMapper();
We create a GameService instance in the GameServlet class, since GameService depends on the Servlet to trigger. Once we receive the HTTP reuqest from frontend, we will call the create method in GameService to create the Game object.
ObjectMapper is the class provided by Jackson that used to serialize and deserialize any Object.
protected void doPost(HttpServletRequest request, HttpServletResponse response) throws IOException {
   ...
}
We change our HTTTP doGet Method into doPost Method, because we are simulating that we receives request from the frontend to add this Game into our database.
If you see something as followed, that means you success~